|
|
|
|
CHAINING…A SIMPLE COURSE, A NECESSITY IN WINTER!
Common sense is, and always has been, dependent upon a certain level of knowledge combined with intelligence. I don’t know if the intelligence levels are actually declining, but the knowledge imparted to make intelligent choices or decisions certainly has. No, you can’t fix stupid! But there is a big difference between being stupid, and simply being ignorant of certain facts. Ignorance is probably the biggest problem…but it can be fixed with a little knowledgeable instruction.
Topic Index:
Winter driving and being prepared.
State by State chain requirements.
Chaining up.
Are your chains ready for use?
Chains and their parts by name.
Chain up/off location.
Preparing to drape the chain.
Drape the chain.
One move with the tractor/trailer onto chain.
Connecting chain ends.
Cam adjustment.
Bungee cord use.
Walk around and check all chains before proceeding.
Driving with chains on.
Speed limit.
Window(s) down for hearing tell-tale noises.
Jake Brake (compression/engine brake) use in snow.
Extra security/safety space when driving.
Foot brake use in snow.
Removing chains.
Use reverse of chain up exercise.
Gathering and storing the chains.
Logging requirements while applying and removing chains.
Winter Driving and Being Prepared.
Cold weather driving requires a higher level of defensive awareness.
Additional space between you and the vehicles in your immediate proximity.
Particularly after the first rain, the road surface is covered with an oil film. This “film” when mixed with water (rain) is very slippery reducing gripping traction and requires an increased distance for stopping. Keep this in mind and allow extra space in any wet condition, for your safety as well as others. After this first series of storms, drivers can get a false sense of security thinking things have come back to “normal”. Don’t allow yourself to fall into this error in thinking. Any wet conditions will detract from safe driving distances for stopping. It is your responsibility, as a Professional Driver, to operate the vehicle you are driving in a safe, controlled manner at all times. Always allow for a greater distance for stopping or quick slowing.
Keep an eye on all “points of your compass”, in other words, be aware of all four sides of your vehicle…front, rear, right and left sides…and maintain your “safe cushion” to all these “points”. From the rear, be aware of the driver coming onto you in an unsafe manner, be prepared for his/her inability to stop or slow in time if something suddenly happens in front of you. On each of your sides, be aware of where the vehicle(s) are and their basic description, (color, car or pick-up, big rig or box truck)…knowing what is over there and when it has cleared your “space” will aid you when forced with a “drastic emergency movement”.
Weather conditions ahead in your trip should be attained before departing.
We all travel with schedules and restrictions peeking over our shoulders. Knowing what the weather will be in two hours or two days ahead of our present location will aid in planning your days drive. In some cases, as a Professional Driver, you will not have the option to sit and wait, but must continue on to make your schedule work. Knowing in advance about inclement weather offers you the opportunity to adjust your sleep or rest schedule to work with the upcoming expected delay. No storm can be considered “Unknown Emergency Delay”, not when the radio (NOAA Weather and local/national services) is advising motorists of the oncoming storm.
Don’t think that driving in clear warm weather will be the same in winter. Freezing rain, snow, white out visual conditions, heavy dense fog, drifting and blowing snow, and black ice are just a few of the potential hazards you can encounter. Suddenly driving into any of these situations, at your regular warm weather speeds can put you in the ditch. Knowing these conditions can exist should be enough to convince any driver to slow down and be more aware of their surroundings, and be more “in tune” with all vehicles occupying the roadways.
Allow some additional time for your trip in the winter months. With the mountainous routes traveled in the West, weather, can and will change rapidly. The driver who is prepared and aware of these subtle and dramatic changes will be the driver that can have a successful and uneventful winter driving season. As a professional driver, you are expected by both your company and your fellow driver to be safe and prepared for all driving conditions. It is your responsibility to be aware of the road conditions ahead of you, to have the equipment and skills to manage these conditions. To have the where with all to know if the weather and road conditions are safe to travel, or to shut down and let the storm and road conditions improve.
Equipment, clothing, and emergency rations on board in case of breakdown.
Make sure you have all of your medications refilled before leaving for your run.
In the winter you should have certain things along with you in the truck that you normally wouldn’t have in the summer. The question you need to ask is…”If it was 20 below zero, and I am stuck in the truck for several hours, or even a couple of days, with no help…what would I need?”
Extra clothes, shoes and blankets should be on board your truck during the winter months.
Layers of clothes are better at keeping you warm than a single heavy garment.
Panty hose are good to wear if you are outside a lot.
Plastic bags between your shoes and socks in the event that you have to walk through slush to get help.
A couple of the 55 gallon ones make a good water proof covering which will help keep you dry.
Food that doesn’t require refrigeration or cooking to eat, such as beef jerky, tuna or any canned food. You can always warm it up on the engine if need be…make sure you put a hole in the can you are heating so the pressure can be released. Don’t forget to have a can opener and eating utensils on hand.
Paper towels, baby wet wipes, bathroom tissue, and a rubber maid bowl with a lid (gallon size) for the situations when there are no bathroom facilities available. Have some sealing plastic bags to place in the bowl for the “need”!
Towels (shower type, cloth), rags, and waterless hand cleaner is always good to have handy for personal cleanup.
Rubber gloves, or latex gloves to wear inside your regular gloves…keeps oil and fuel from causing skin irritation and that smell we love to have inside the truck.
Antifreeze/coolant, oil, tire pressure gauge, alcohol, windshield washer fluid. Try adding some ammonia and alcohol to the washer fluid to get rid of the road film and keep it from freezing. Any type of soda (Coke, Pepsi, Mountain Dew) will also get rid of that film…great for bugs too!
Extra wiper blades (cannot be stressed enough) and for the winter months, the heavy duty “winter” blades are better than the regular blade for rain.
Extra batteries for your flashlight (bulb(s) also)…nothing is worse than having no light when you need it.
Have a tube of white lithium grease to apply to exposed electrical wires.
A 3 lb. hammer to break ice from brake drums or from slider rails, light hits to the brake drum, when the sound goes from a “thud” to sounding like a bell…the ice is clear. Always be careful when banging, pulling, screwing, or twisting any line or fitting (air lines, fuel filters, glad hands, etc.) made of plastic, aluminum, steel or any metal in extreme cold. Plastic air lines and fuel lines can, and will shatter like glass in these temperatures, and most metals become very brittle as well.
For heat when everything else is without power, carry a quart size metal can and several large candles. Soften the wax at the base of the candle and place candle in the can. Light the wick…the metal can is a heat reflector. You can melt snow in a tin cup (or small can) over this to give you water. Don’t forget to keep a window slightly open; any open flame consumes oxygen. Do NOT use a pressurized camp stove inside the cab…they use up available oxygen faster than you can replace it…kills you in minutes. Do not use scented candles…the chemicals for the “scent” become extremely toxic in enclosed spaces.
Keep snow dug away from the grill and headlight areas, downwind door and low mounted exhaust. Grill and exhaust are obvious, when blocked they can cause the engine to shut down. The cleared door area is to allow you to get out of the vehicle, clear lights are for signaling if you hear something coming…snow plow, other vehicle…so you can quickly be seen and found.
Do not work up a sweat…this will freeze between your clothing and skin and you are well on your way to being DEAD! If you do get wet…strip off the wet clothing, dry yourself off, and put on fresh dry clothes….IMMEDIATELY!
Stay with your vehicle; do not try to walk out for help. It is much easier for rescuers to find you within your vehicle, plus you won’t get lost.
Do not go to sleep…Hypothermia kills by putting you to sleep and you never wake up!
Parking and freezing brakes.
After driving for a period of time, even in cold wet conditions, the friction from the road surface will cause the tires to heat up. When pulling into the location to park, try driving slowly around the parking area to let your tires cool down. This will prevent your tires from freezing to the parking surface. Parking with the tires hot will cause the snow to melt under the tire, as the temperature drops, the heated area will freeze creating a “cup” you can’t pull out of. If you can’t circle a bit to cool down the tires, get parked and wait about 5 minutes and roll the tractor forward a few feet, then back, and repeat a few times. This will take the tires out of the frozen patch and the part of the tire now on the ground will not freeze to the surface as it has had time to cool. You will not be able to apply chains in this “frozen scenario” either…so be aware of getting stuck in a level parking lot…a bit embarrassing!
Drain your air tanks daily!
Allowing condensation (moisture) to accumulate in your air lines can stop you dead in your tracks. The moisture will get drawn up into the service line and at the low point of the air line; the moisture will freeze creating a blockage so no air can flow through the line.
Occasional, light application of breaks during the course of the driving period.
As you are driving in wet, snow conditions, the moisture and/or snow can accumulate on the brake system. The brakes should be lightly applied to generate some heat to dry or remove this buildup, in wet/cold conditions braking ability is reduced due to the extra delay of creating a dry drum/pad necessity…stay on top of your braking ability.
Identifying adverse road conditions.
One of the most important skills to the professional driver is “reading the road”. In the summer, you can run all day and not be concerned about the surface condition underneath your tires. In the winter, it is a completely different story. Black Ice and snow covered ice is something you generally can’t readily see. Black Ice is often formed when moisture builds up on bare asphalt that has been warmed by vehicle traffic, as the colder air freezes the thin layer of moisture. The ice can have the appearance of either a wet surface, or can look the same as the dry surface. If you encounter this event…maintain your straight attitude, do not apply brakes, simply get off the throttle and allow the engine to slow you down until you are clear of the ice. In this icy situation, “jakes” will cause you to break traction…it is advisable to not have your “jakes” on in icy conditions.
Be aware of snow covered road surfaces…there could be ice under that snow. Vehicles travelling on the snow covered road will cause the tire paths to heat up from the tire friction. As the outside temperature cools, this path can become icy. This can become critical, particularly when travelling down a grade. It is common for the snow covered areas outside of this path to not be as slippery, a place to gain better traction.
In wet and cold conditions, watch the traffic in the opposing direction. Spray coming from the tires of the vehicles will tell you it is wet on the surface, no spray will warn you of possible ice on the road surface.
Keep an eye on your side mirrors (and fender mirrors), if you are seeing a frost build-up on the forward side of the mirror…get ready for slick conditions, you are already in “the zone”.
Watch for shaded areas…under bridges, tree lined sections, or any place a shadow is cast on the road…there could easily be a thin layer of ice in these locations.
Zero visibility…heavy snow fall, blowing snow, fog…SLOW DOWN, to an idle crawl if needed, DO NOT STOP IN THE ROADWAY!!!...continue until you can get to a safe place to pull completely off the road surface.
MIND YOUR SPEED:
With regard to your traveling speed, there are two factors to consider:
Traction and controlling curves and turns in the road.
Braking and the condition of your brakes, along with the weight you are pulling.
The highways and roadways we travel have banked curves and crowned surfaces. When these parts are encountered in slick wet situations, hydroplaning and icy slick surfaces can take the grip from your steer tires. By reducing your forward speed, you can greatly increase the tracking ability in steering and negotiating these dangerous points. Along with forward speed, comes forward momentum. The heavier the load behind the pulling unit, the greater the momentum will affect the performance in turning and braking.
One of the most important skills to the professional driver is “reading the road”. In the summer, you can run all day and not be concerned about the surface condition underneath your tires. In the winter, it is a completely different story. Black Ice and snow covered ice is something you generally can’t readily see. Black Ice is often formed when moisture builds up on bare asphalt that has been warmed by vehicle traffic, as the colder air freezes the thin layer of moisture. The ice can have the appearance of either a wet surface, or can look the same as the dry surface. If you encounter this event…maintain your straight attitude, do not apply brakes, simply get off the throttle and allow the engine to slow you down until you are clear of the ice. In this icy situation, “jakes” will cause you to break traction…it is advisable to not have your “jakes” on in icy conditions.
Be aware of snow covered road surfaces…there could be ice under that snow. Vehicles travelling on the snow covered road will cause the tire paths to heat up from the tire friction. As the outside temperature cools, this path can become icy. This can become critical, particularly when travelling down a grade. It is common for the snow covered areas outside of this path to not be as slippery, a place to gain better traction.
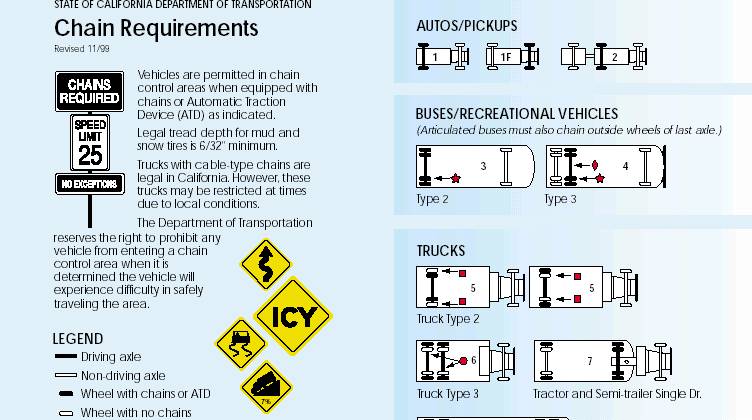
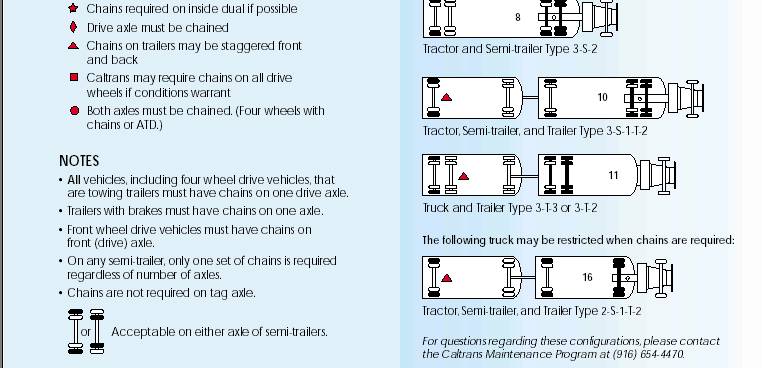
Chain Requirements by State.
The following are the States that DHE operates in and is meant for DHE Chain application knowledge. Beyond the Western States, chain requirements by State often are hard to pin down. Common sense and due diligence, along with extreme caution is highly recommended.
STATE
OF CALIFORNIA
Chain
Requirements
Requirement
One (R1): Chains are required, snow tires are allowed.
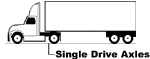
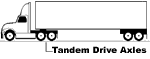
Single axle
trucks pulling trailer(s) required to chain.
Requirement
Two (R2): Chains are required on all vehicles except four wheel drive
vehicles
with snow tires on all four wheels.
(NOTE: Four wheel
drive vehicles must carry traction devices in chain control areas)
Requirement
Three (R3): Chains are required on all vehicles, no exceptions.
RECOMMENDED TIRE CHAIN INSTALLATION:
|
|
|
|
State
of Colorado
Chain
Regulations
Colorado chain law applies to every state highway, federal highway and interstate throughout the state. When the chain law is in effect, drivers will see signs along the roadway indicating which vehicles should chain-up. In some areas of the state, lighted variable message signs will also alert drivers of the chain-up information.
Metal chains must consist of two circular metal loops, one on each side of the tire, connected by not less than nine evenly spaced chains across the tread. Commercial vehicles having four or more drive wheels must chain four wheels. Dual tire chains are acceptable.
NEW VIOLATION PENALTIES
Drivers of commercial vehicles who ignore the chain law can be fined $100 for not putting chains on their vehicles when required. A driver can be fined $500 plus a $60 surcharge if the vehicle is not chained when the law is in effect and as a result blocks the highway.
WHEN ARE CHAINS REQUIRED FOR COMMERCIAL VEHICLES?
There are two levels of the chain law that will affect commercial vehicles. A vehicle is considered to be a commercial vehicle if it is used in commerce to transport passengers or property if the motor vehicle:
Has a gross combination weight rating of 26,001 lbs. or more inclusive of a towed unit with a gross vehicle weight rating of more than 10,000 lbs.;
Has a gross vehicle weight rating of 26,001 or more pounds.
Is designed to transport 16 or more passengers, including the driver.
LEVELS OF CHAIN LAW FOR COMMERCIAL VEHICLES
Level 1
This level of chain law implementation requires that all single axle combination commercial vehicles chain-up. All four wheels of the power drive axle must be chained. Cables are not allowed on single drive axle combination commercial vehicles as an alternative traction device. When level 1 of the chain law is in effect, all other commercial vehicles must have snow tires or chains. Level 1 may be implemented at any time there is snow covering any part off the traveled portion of the pavement on an ascending grade.
Level 2
When the chain law is in effect at this level, chains are required for ALL commercial vehicles. This includes trucks exceeding 26,001 lb. weight, and buses or vehicles that are designed to carry 16 or more passengers. Autotransports must comply with the law to the extent possible without causing damage to hydraulic lines. Buses need to chain only two drive wheel tires. (Cables are not allowed on single drive axle combination units, they must use chains!)
Level 2 may be implemented any time there is snow covering the entire traveled portion of the pavement on an ascending grade or when in the discretion of the highway maintenance supervisor (or designee) road, weather or driving conditions make this restriction necessary to protect the safety of the traveling public or minimize occurrence of road closures.
Approved Alternative Traction Devices (ATD's)
Approved ATD's may be used instead of chains. These include wheel sanders (vehicle must carry enough sand to negotiate the hill), or pneumatically driven chains which when engaged, spin under the drive wheels automatically as traction is lost.
The rules and regulations disallow the use of tire cables on commercial vehicles. The following are the only two approved situations in which cables can be used:
Tire cables constructed with high strength steel spring cross member rollers that are at least 0.415" diameter or greater can be used instead of chains on commercial vehicles with the exception of single drive axle combination vehicles.
On a tandem power drive axle commercial vehicle any type of cable can be used only if there are chains on the outside tires of one of the power drive axles and cables on two or more tires of the other power drive axle.
The Colorado Department of Transportation will be monitoring the use of cables and their effectiveness this winter. The Department can at any time rescind the approval of cables as an ATD.
DOES MY TRAILER NEED TO BE CHAINED UP?
Colorado has no rule or statute regarding the requirement for chains on trailers. Tire cables are acceptable for use on trailer tires.
WHERE CAN I CHAIN-UP?
Trucks placarded for Flammable, Combustible, or Explosives may pass the chain-up signs and install their chains where the pavement is covered by snow or ice, at a safe location outside the traveled portion of the highway.
INTERSTATE 70 CHAIN-UP STATIONS
Eastbound I-70: Milepost 180, 182.6, 183.8 (shoulder only), 186.2, 203 (Frisco scenic overlook), 210.8 (three miles below Eisenhower Tunnel).
Westbound I-70: Milepost 228 (Georgetown), 221 (Bakerville), 218.5 (Herman Gulch interchange), 195 (Copper Mountain overlook).
AFTER I PUT MY CHAINS ON, CAN I CONTINUE WITH MY LOAD?
Colorado Department of Transportation personnel or law enforcement may control the reentry of vehicles from the chain inspection stations to the state highway to assist and enhance the flow of traffic as assure the safety of the traveling public.
AT WHAT POINT CAN I TAKE MY CHAINS OFF?
The chain law shall cease to be in effect where designated by a sign or when bare pavement is encountered on a descending grade.
Idaho
Idaho does have a chain law, which can be found in Idaho Code, section 49-948. It currently only applies to the following passes in Idaho; Lolo on US12, Look Out and 4th of July on I-90.
NEVADA/CALIFORNIA CHAIN REQUIREMENT COMPARISON
|
Chains Required, Except For: |
Nevada does not use this condition. |
Cars and light trucks < 6,000 GVW must have mud-snow (M-S) tires on driving wheels. Motorists are advised to carry chains. Vehicles > 6,000 GVW must use chains on drive wheels. (R-1) |
|
Chains or Snow Tires Required: |
Vehicles < 10,000 GVW are required to use snow tires or approved traction devices. Vehicles > 10,000 GVW must use chains on driving wheels and braking wheels of trailer. Four-wheel-drive OK with four mud-snow (M-S) tires. NAC 484.240 (1) |
Chains required on all vehicles, except four-wheel-drives or all-wheel-drives with snow tread tires on all four wheels. All-wheel-drive and four-wheel-drive vehicles must carry chains. (R-2) |
|
Chains Mandatory |
Chains required on all vehicles, except four-wheel-drive with four mud-snow (M-S) tires. NAC 484.240 (2) |
Chains required on ALL VEHICLES without exception. (R-3) |
Definition of “Snow
Tires” (both
states): Special tread for greater traction on slippery surface and
have a sidewall marking (M-S,
M/S, international symbols)
indicating that it is an approved all-weather tire. At least 3/16"
of tread depth.
Definition
of “Approved Traction Devices” (Chains):Made
of steel or plastic; have cross ribs with at least one link under
tire tread while in motion; connecting rings on both sides of tire.
OREGON
When you drive in winter conditions, you may see signs telling you to carry chains or traction tires and when you are required to use them. In some areas, lighted message signs also will advise you about chaining up. To view the signs or learn more about Oregon's chain law and the vehicles that may be exempt from it go to Oregon's Chain Law.
When signs tell you that chains are required on all or certain types of vehicles, chains must be placed as generally described below. Specific information on chain requirements is listed in Oregon Administrative Rule Chapter 734, Division 17. To view the administrative rule go to: http://arcweb.sos.state.or.us/rules/OARS_700/OAR_734/734_017.html.
In typical winter conditions, vehicles rated at 10,000 pounds gross vehicle weight (GVW) or less and not towing or being towed are allowed to use traction tires in place of chains. For traction tire information go to Traction Tires.
In very bad winter road conditions all vehicles may be required to use chains regardless of the type of vehicle or type of tire being used. This is known as a conditional road closure. A conditional road closure may occur on any of Oregon's highways and are frequent in the winter on Interstate 5 through the Siskiyou Pass south of Ashland.
The following provides examples of chain placement based on vehicle and trailer configurations. It is not the intent of the following examples to portray or suggest mixing of different types or designs of tires on a single axle. For these examples, please use the following legend.
|
Legend |
|
|
|
Tire without chain. |
|
|
Tire with chain.* |
|
|
Chains may be placed on either axle. |
|
|
Chains may be placed on either side. |
*Note: When one tire of a dual-wheel axle is required to have a chain, the chain may be placed on either the inside or outside tire.
Vehicles with a GVW rating of
26,001 pounds or more that are towing one or more
trailers.
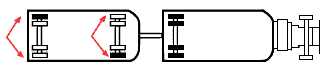
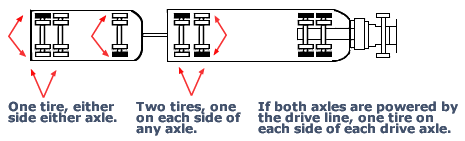
Single-drive axle commercial vehicles towing
a trailer must have chains on two tires on each side of the drive
axle and one tire on the front axle and one tire on one of the rear
axles of the trailer.
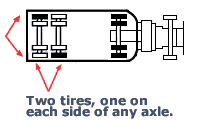
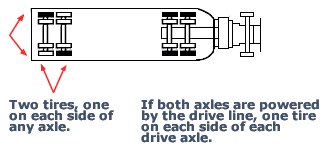
Single-drive axle commercial vehicles towing a semi-trailer must have chains on two tires on each side of the drive axle and two tires, one on each side, of any axle of the semi-trailer.
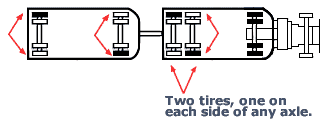
Single-drive axle commercial vehicles towing both a semi-trailer and a trailer must have chains on two tires on each side of the drive axle, two tires, one on each side, of any axle of the semi-trailer, and one tire on the front axle and one tire on one of the rear axles of the trailer.
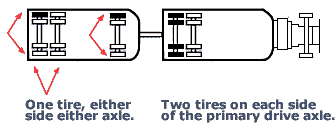
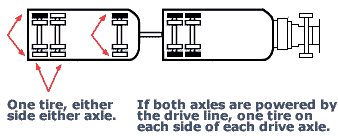
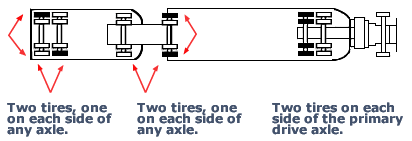
Tandem-drive axle commercial vehicles towing a trailer must have chains on two tires on each side of the primary drive axle; or if both axles of the vehicle are powered by the drive line, one tire on each side of each drive axle. Chains must also be placed on one tire of the front axle, and one tire on one of the rear axles of the trailer.
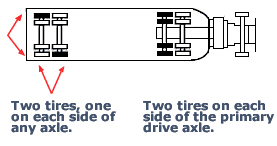
Tandem-drive axle commercial vehicles towing a semi-trailer must have chains on two tires on each side of the primary drive axle; or if both axles of the vehicle are powered by the drive line, one tire on each side of each drive axle. Chains must also be placed on two tires, one on each side, of any axle on the semi-trailer.
![]()
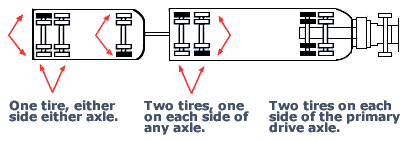
Tandem-drive axle commercial vehicles towing both a semi-trailer and a trailer must have chains on two tires on each side of the primary drive axle; or if both axles of the vehicle are powered by the drive line, one tire on each side of each drive axle. Chains must also be placed on two tires, one on each side of any axle on the semi-trailer and one tire on the front axle and one tire on one of the rear axles of the trailer.
![]()
Tandem-drive axle commercial vehicles towing a semi-trailer and a semi-trailer that are connected by kingpin-to-fifth wheel assembles, commonly referred to as a "B-Train" or connected by kingpin-to-fifth wheel “C-dolly” assemblies, commonly referred to as a “C-Train”, must have chains on two tires on each side of the primary drive axle; or if both axles of the vehicle are powered by the drive line, one tire on each side of each drive axle. Chains must also be placed on two tires, one on each side, of any axle of the semi-trailer at the B-Train or C-Train connection and on two tires, one on each side, of any axle of the rear semi-trailer.
![]()

TEXAS
Texas has no specific rules regarding the use of chains on either personal or commercial vehicles. The TX-DOT recommendation is: “Use snow tires and/or chains as needed.”
A. Locations shall be requested by the Department's District Director after coordinating with the local Utah Highway Patrol office. The designations by the Executive Director shall be established through a Traffic Engineering Order (TEO) from the Division of Traffic and Safety to the District Director's office wherein the designated highway is located.
C. When any designated highway is so restricted, no vehicle or motor vehicle shall be allowed or permitted the use of the highway, during the period between November 1 and March 31, unless:
1. Said vehicle is equipped with either:
a. Steel link chains or have chains in possession; or
b. Mounted snow tires; or
c. Elastomeric tire chains, designed for use with radial tires.
2. Four-wheel drive vehicles must have a minimum of two mounted snow tires to meet the requirements.
3. Radial tires without snow tread do not meet the requirements.
WASHINGTON
All vehicles over 10,000 pounds
gross vehicle weight (GVW) shall carry a minimum of two (2) extra
chains for use in the event that road conditions require the use of
more chains or in the event that chains in use are broken or
otherwise made useless,
WAC
204-24-050 (2) (f).
Approved chains for vehicles over
10,000 pounds gross vehicle weight shall have at least two side
chains to which are attached sufficient cross chains of hardened
metal so that at least one cross chain is in contact with the road
surface at all times. Plastic chains shall not be allowed. The
Washington State Patrol may approve other devices as chains if the
devices are equivalent to regular chains in performance (cable chains
allowable).
On the following routes all vehicles and
combinations of vehicles over 10,000 pounds shall carry
sufficient tire chains to meet the requirements from November 1 to
April 1 of each year or at other times when chains are required for
such vehicles:
I-90 between North Bend (MP 32) and Ellensburg (MP 101)
I-82 between Ellensburg Exit 3 (MP 3.00) and Selah Exit 26 (MP 26.00)
SR-97 between (MP 145) and Junction
SR-2 SR-2 between Dryden (MP 108) and Index (MP 36)
SR-12 between Packwood (MP 135) and Naches (MP 187)
SR-97 between junction SR-14 (MP 4) Columbia River and Toppenish (MP 59)
SR-410 from Enumclaw to Naches
SR-20 between Tonasket (MP 262) and Kettle Falls (MP 342)
SR-155 between Omak (MP 79) and Nespelem (MP 45)
SR-970 between (MP 0) and (MP 10)
SR-14 (MP 18) to Junction 97 (MP 102)
SR-542 Mt Baker Highway between (MP 22.91) and (MP 57.26)
Vehicles making local deliveries as indicated on bills of lading and not crossing the mountain pass are exempt from this requirement if operating outside of chain required area.
The Washington State Department of Transportation or Washington State Patrol may prohibit any vehicle from entering a chain/approved traction tire control area when it is determined that the vehicle will experience difficulty in safely traveling the area.
WYOMING
31-5-956 (e). Tires, restriction of travel under hazardous conditions; penalties
When the chain law is in effect due to snow, ice or other conditions, travel on a highway may be restricted to use only by motor vehicles utilizing adequate snow tires or tire chains, motor vehicles that are all-wheel drive or necessary emergency vehicles, including snow plows. In extremely hazardous conditions, travel may be restricted to use only by necessary emergency vehicles, including snow plows, and those vehicles utilizing tire chains or to all-wheel drive vehicles utilizing adequate snow tires with a mud and snow or all-weather rating from the manufacturer having a tread of sufficient abrasive or skid-resistant design or composition and depth to provide adequate traction under existing driving conditions. The prohibition or restriction of use shall be effective when signs, including temporary or electronic signs, giving notice thereof are erected upon that portion of the highway, and it shall be unlawful to proceed in violation of the notice.
The operator of a commercial vehicle shall affix tire chains to at least two (2) of the drive wheels of the vehicle at opposite ends of the same drive axle when the vehicle is required to utilize tire chains under this subsection......
Chaining Up
Are Your Chains Ready For Use?
Before the need arises, and in moderately cooler weather, lay out all your chains and do a thorough inspection. It is advisable to lay all your chains out together, making sure they are the same size. Apply one chain to guarantee they are the proper size for your specific tire size. Practice is always a good thing!
Check the cross links and the connection of the cross link to the rails (“Dogs” is one term for the rough pointed side of the cross link connector link). Be sure all the “Dogs” are facing the same direction (up or down). Be sure all connections are clean and pliable. Find any broken cross links and have them repaired or replaced.
Check all the cams. Turn each cam completely from open position to closed position, checking for bent areas, burrs that can hang up smooth movement. A small round or flat file will remove any burrs. Check both sides of the cam and rail connections; be sure they are solid and complete. A bent or crushed cam leaves the chain unusable. Repair and replace as necessary.
Check the connectors at each end of each rail. Any bent or broken connector makes the chain unusable. Check the slide lock on the end of the outside connector, crushed or bent again makes the chain unusable. Repair or replace as necessary.
Inspect the rails. As for all other chain parts, check for broken pieces or sections. Repair or replace as necessary.
Count the bungee cords. You should have a minimum of 2 cords per chain, more is better, but 2 are good. Check their condition. Dried, brittle, or cracked rubber will be of no use when the stretching snaps the bungee. Check the “S hook” on each end of the bungee. Replace or replenish as necessary.
Make sure you have a chain key, at least one, and check to make sure the flat end fits in the cam turn hole. Either the “T” type or the “L” type work fine.
Rust is normal and inevitable on steel chains. The first use of the chain on wet/dry pavement will remove most of the rust from the working sections. If the rust is excessive, making the chain non-pliable, or there are rust “pitting’s” the chain should be replaced.
Chains and their parts by name.
Rails. The main outside line of chain links creating the length of the chain. “3 Railer”, or “Double chains”, have 2 outside rails and a 3rd rail running down the center.
Cross Links. The sections of chain links that connect the two (or three) rails. The cross links will be placed across the tread of the tire.
“Dogs” or “Points”. The chain link that connects the cross link to the rail has one side that has two “prongs” from the cut of the link and is bent around the chain link end of the cross link. These “Dogs” should be facing the same direction (up or down) on every cross link, on both rails.
“Hook with slide lock” connector. On one end of one rail will be the “hook and slide” connector. The “hook” part fits through the opposite end connector link, hinges back and fits between the slide body, then the slide lock slips over the hook and catches on the crook of the hook.
Cam. The cams tighten the chains after the chain has been mounted and connected on the tire. Newer tires (greater tread depth) will not need all cams turned to the “closed” position. Older tires (less tread depth) could require all cams to be closed. There is no set number of cams that require to be turned into the closed position; this will vary by the age/use of the tire the chain is being applied to.
Hook connector. On the same end but opposite rail of the loop connector, the end of the chain has a hook link that “hooks” into the opposite end of the rail.
Rail connector. The end of the rail with standard chain links.
Chain up/off location.
THIS IS NOT THE PLACE TO WAIT OUT THE CHAIN CONTROL REQUIREMENT. IF YOU AREN’T APPLYING YOUR CHAINS…WAIT DOWN THE MOUNTAIN UNTIL THE REQUIREMENT HAS BEEN LIFTED!
Signs posting the location when chains will be required will often be in place as you travel closer to the chain zone. Also other trucks (that know the common places to facilitate the process) will be parked and chaining up away from, and before the “crowd” at the check point. These “early appliers” know they will be running their chains on wet/bare pavement for some time prior to encountering snow covered surfaces. In this application, tight secure application is a must. Sloppy, loose fitting chains will stand a higher “break down” issue, as the chain parts (cross link sections) get twisted and ground as they come around and make contact between tire and pavement.
When stopping to apply your chains; remember to leave space in front to move your truck forward, (to roll onto chains) and leave space for the truck in front to roll back. Do not “trap” other trucks by moving in to close, or blocking another truck from moving out. Be sure you are off the traveled road surface, clear of oncoming traffic, and be continually aware of the other moving/approaching vehicles. Keep in mind, there are many other truckers and 4 wheelers that think it is a fun thing to “splash” a trucker working on his/her chains. These “drivers” will be moving along close to the stopped vehicles…be ready to “dive” under your trailer so you don’t get clipped or hit by these inconsiderate “drivers”.
As you move along within the “chain-up” or “chain-off” zone, be courteous of the others parked and working their chains. Just as you do for an emergency vehicle on the side of the road, get over in the outside lane to pass by the vehicles on the shoulder. Keep your speed down to below the speed limit for the area, and pay close attention to the drivers or “chain monkeys” working on their vehicles. If you can’t get out to the outside lane, pay very close attention to people working around their vehicles. Continue ahead slowly ready to avoid the workers…they could fall back or slip and fall into your path.
For removing your chains; do not remove your chains before the opposite direction of travel is applying their chains. It is advised to continue past the “group” of vehicles removing their chains to a safer, “quieter” location. While most will use the shoulder of the roadway, an off ramp is a safer place. Do not stop on the “off ramp” side, but continue to the “on ramp” side, and be sure to leave sufficient room for vehicles to safely pass by…you probably won’t be alone at this location.
Preparing to drape the chain.
Know which tires you will be chaining. Trucks with front mud fenders (metal), chaining the closest tire to the mud fender is not a good plan. A broken cross link can tear the mud flap to shreds. Trailers with the “underbelly wing” same issue. Apply the chain to the rear tires of the tandem unit. Double check you have your bungees and Chain key on hand! Without a Chain Key…there is no need to put the chains on since you won’t be able to cinch them tight. Take one chain to the tire location you will be applying the chain. Lay out the chain, and spread the chain out completely. Check for twisted sections and note the side that the cams are on. Also note which direction the “Dogs” are facing. Remember, “Cams out, Dogs up”! Remember…you need to keep moving and be aware of oncoming traffic.
Follow the same procedure for each tire that requires a chain.
Drape the chain.
Are you facing uphill, downhill, or on level ground? This “attitude” will determine whether you roll forward or back onto the chain. If uphill, you will roll back onto the chain. If downhill, roll forward. And if on level ground, either way will suffice. Once you have determined which way you will roll onto your chain, drape the chain so that the single cross link (direction of roll) is tucked just before the tire meets the road and the cross link is on the ground, not “floating” above the surface. Be sure the connectors are clear of the tire (both inside and outside). The remaining chain (on the opposite end) will “gather up” as the tire rolls.
With the chain is lying on the ground, grasp the chain rail opposite the cams at approximately 1/3 in from each end. Lift chain over the tire and lay the chain on top of the tire, keeping the cams to the outside and equal “fall over” on both sides. Be sure the “Dogs” are facing up away from the tire…now double check “CAMS OUT, DOGS UP”!
Make sure the chain is straight and equal on both sides, now set up the “roll on” cross link (front or back of tire). Grab both rails and pull the draped chain so the “roll on” cross link is on the ground at the roll on point. Using a “right then left” alternating tug is the easiest. Pulling both sides at the same time is more difficult. Tuck the cross link against the rubber making sure the connectors are clear of the tire. For the excess chain (opposite side), there will be about 3 or 4 cross link sections hanging. These will “draw up” as you roll onto the chain.
Repeat for all tires requiring chains. BE SURE TO DRAPE ALL CHAINS THE SAME DEPENDING ON DIRECTION OF “ROLL ON”!
One move with the tractor/trailer onto the chain.
Before moving the tractor, double check all the chains are positioned the same. Cams out, Dogs up, connectors clear, and roll on cross link is the same on all tires.
When you prepare to roll onto your draped chain, do not “spin” you tires. Carefully, slowly roll onto your chain, watching the closest chain/tire in your side mirror. Roll enough to bring the “draw up” extra to be approximately 1/3 of the tire height off the ground. Going beyond the ½ way point could cause the chain to fall off the tire…then you are back to square one. The 1/3 to ½ height is a comfortable height to complete the chaining process.
Connecting chain ends.
Cam adjustment.
Bungee cord use.
Have your Chain Key and bungee cords in hand as you go to connect the ends of the chain. At each tire, place your “Key” inside the wheel rim, and your bungee cords to your side. By placing your key inside the wheel rim, and not in your pocket, there is less chance of losing your Key. Dropping the key into the snow and slush…sometimes it is very hard to find it again! A little “better to be safe than sorry” habit that is strongly advised!
It is best to start with the chain closest to the driver seat. Always hook the inside ends first. Hook the “inside hook” connector to the inside rail extension links at least midway of the links available. Now connect the outside “rail extension links” with the “hook and slide lock” connector. The hinging hook feeds through one of the extension links. This should be a bit snug, if not, adjust the inside connection a bit tighter to take the “play” or “slop” out of the outside connector. If it is too tight, reconnect the inside hook a bit looser. Now reconnect the outside connector and double check the slide lock is positioned over the hook and secure.
With your Chain Key, close as many cams as possible. Make sure the cams “click” completely closed. Start with the cam closest to the outside “slide and lock” connector, and continue alternating top and bottom so to speak. Do not just work your way around the tire. Always use the “slide and lock” connector as your beginning point, closing the cam closest to the connector from the previous cam.
Put your Chain Key back in the wheel well!
The first bungee cord will be used to secure the “extra” rail extension links at the “slide and lock” connector to the rail. Without securing these extra links, they can actually “bang” a hole in the bottom of the trailer…besides the “banging” is a noise you just don’t want to listen to driving in the peaceful snowy drive!
With the end of the S-hook of the bungee, slip the hook (outside in) through the end link of the rail extension links, then feed the hook (bungee cord S-hook) through a rail link away from the “slide and lock” connector. The opposite end of this bungee will be stretched (as close to center across the wheel face) and connected to the inside rail. Do not connect a bungee to a cross link connection! Apply a second bungee to the outside rail creating an “X” appearance with the two bungee cords.
If the tire the chain is being applied to is extremely worn the chain would be the correct size, but has some “slop” that cannot be tightened out with the connectors. Apply a third bungee to get this “slop” corrected. If this third bungee does not take the “slop” out, the chain is probably the wrong size for the tire. Also, often trailer tires will tend to be not as tight as drive tires due to the difference in tread depth and type. Do what is necessary with your bungee cords to keep the chains tight against the tire.
Continue around unit connecting each chain…one trip around.
Walk around and check all chains before proceeding.
After connecting and closing cams and applying bungees to last tire, walk back around the rig double checking each chained tire. Be sure all are secure and tight, your Chain Key is in your hand, and any extra bungee cords are also in your hand. Do not leave “working materials” on the roadside…you will need them soon enough.
Driving with chains on.
Speed Limit.
The speed limit for driving chained up is 25 MPH. This is the maximum speed, and has been determined for safety and also for chain life. Especially when operating on wet/bare road surface.
Window(s) down for hearing tell-tale noises.
The sound you should be hearing is a dull “hum” as you drive with the chains on wet/bare surfaces. Once on the packed snow, or loose snow, you actually will feel the chain rather than hear the “hum”.
Pay attention to any “banging” or “whop-whop” sounds. “Banging” noise is an indication that the excess links at the connector have come loose and are slapping against the trailer bottom side. And the “whop-whop” sound is indicative of a cross link that is slapping the underside of the trailer or an inside section slapping the frame or other critical part on the underside of your rig. When either of these noises occurs…ASAP… get to a safe place to pull over and correct the noise.
Jake Brake (compression or engine brakes) use in snow.
This is a highly debated subject, and both sides (“the use of” and “do no use”) have legitimate arguments. The decision to either use or not use is purely an individual decision. While this applies to use on snow covered surfaces, the use of Jakes on ice is left without question…DO NOT USE JAKES ON ICE!
Extra security/safety space when driving.
There is no such thing as a “panic stop” with chains on. The driver needs to allow some extra distance between vehicles when traveling in such conditions as wet, snow covered, or icy road surfaces. It is always recommended to just back off to keep your comfort zone and allow for the necessary additional distance to stop or to slow for an upcoming problem.
Always be more aware of your side proximity to other vehicles, roadway edges, debris in your path, and all other vehicles. Broken chains, “snow/ice bombs” (the big semi-solid masses of frozen snow from other vehicles), and other motorists along the road can and will cause problems if not seen and reacted to as needed.
Foot brake use in snow.
Gentle and smooth application of brakes is the way to go. Do not apply excessive pressure on the brake pedal. The wheels/brakes will lock up faster since there is less resistance when traveling in these conditions. Do not use the “Johnson Bar” for your braking fi your tractor is equipped with one. You want all brakes applying equal pressure…so be sure your brakes/slack adjusters are in proper working order before proceeding into snow country.
Removing Chains.
Use reverse of chain up exercise.
There really is no way to see if you are stopping on top of your connection point of the chains, it is a “luck of the draw” issue. Stop, get out, and check that your chain connector location is workable, that you are not stopped directly on top of the connector location. All connectors probably won’t be in the same position (as they were when you chained up) as chains do tend to “drift” as you travel on them. Again be sure to leave enough room for the necessary movement of your tractor to roll off the chains. Also, be considerate of others also removing their chains and the space they will need.
Once stopped and to begin removing your chains, this should be done with one single move of the tractor after disconnecting and dropping the chain off the tire. Place your Chain Key in the wheel well at the first tire, remove bungee cords and place them to the side you will be moving to next, use your Chain Key to open the first cam (the rest should be able to be opened with your fingers, if not Key them open), replace the Chain Key to the wheel well, disconnect the outside connector, then the inside connector.
Now take the disconnected chain and lift from the tire and lay on the ground, at an angle away from the tire. Do not drop the chain to the ground so that you will run over or on top of the removed chain when you roll off the chain. Be sure to pay attention to chain location on how far you will need to roll to be clear of all chains before stopping to gather up your chains.
PAY ATTENTION TO ONCOMING TRAFFIC WHEN REMOVING YOUR CHAINS!
Gathering and storing the chains.
To gather up the chains and neatly hang them on the chain rack; Grab the first cross link (either end), skip two cross links grab the next, skip 2 grab, skip 2 grab, skip 1 grab, and grab the last cross link. Using this method, the chains will hang evenly and not get tangled up when you hang them on the chain rack.
PAY ATTENTION TO ONCOMING TRAFFIC WHEN GATHERING YOUR CHAINS!
Logging requirements when applying and removing chains.
Whatever the time it takes you to apply your chains; you need to be on Line 4 (On Duty not Driving), the same for removing them. Keep your log up to date during your “fun” in the snow! There is a much higher chance or risk of accidents in this environment…so be pro-active with your minimum requirements.